
The Universal TCP/IP Network Bootdisk is a DOS bootdisk that provides TCP/IP networking support. It's designed for use in Microsoft networking environments, on either peer-to-peer or domain based LANs. Currently 98 different network card drivers all included, all on the single 1.44MB disk! Most people use this bootdisk for "Ghosting" PC's over a network connection. This disk will provide the DOS networking and drivers to allow the mapping of a network drive containing your imaging software and files. TCP/IP based image transfers, like GhostCast is also supported!
Building a NetBootDisk
Once you have downloaded the files for the disk, follow the instructions on this page. If you don't have a physical floppy disk drive, consider using floppy disk emulation software. You can then use this image for use via floppy emulated CDR/USB/PXE.
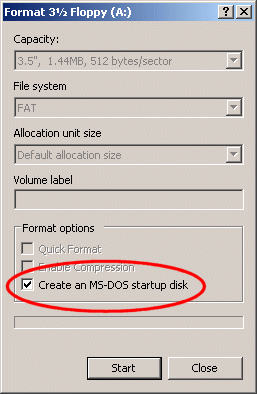
STEP 1: Format a floppy disk as a Startup/Bootable disk
A computer running Windows XP computer is required for this. Alternatively, a PC-DOS 7 bootdisk can be used. Windows 95/98/ME can not be used for this. The reason for this is that Windows XP places much smaller sized startup files on the disk when compared to previous versions. A Win95/98/ME formatted disk will simily not have the free space to fit everything.
In Windows XP's Explorer, format a Floppy Disk with the "Create an MS-DOS startup disk" option ticked.
STEP 2: Unzip the downloaded ZIP File
Extract the ZIP archive you downloaded to a temporary folder, preferablely where nothing else is. A batch file should appear, along with a subdirectory called FILES.
NOTE: Make sure the Winzip's extract with 'Use Folder Names' otpion is selected.
STEP 3: Run MakeDisk.bat
Run MakeDisk.Bat and follow the on screen instructions. This batch file will use the command.com from the disk and compress it, along with all the other networking files required.
PC-DOS 7 users will have to manually add HIMEM.SYS to the floppy disk, then un-comment the himem.sys line in the A:\config.sys file.
Once this is complete, the disk is ready for use, unless you want to add read-only NTFS support.
DONE!
Once your done, I'd highly recommend making a backup or a disk image of the floppy in case your disk gets eatten by a rogue disk drive!
Adding NTFS DOS Support (Optional)
UPDATE 2014 - The content below was originally published back in the early Windows XP days before Windows PE was around. Personally I wouldn't even bother using NetBootDisk for reading NTFS now, but I'll still include these instructions anyway since I've already documented it...
To add support for reading/accessing NTFS partitions, you'll need a copy of NTFSDOS on another source, like a 2nd floppy disk, CDROM, or a network share that the bootdisk can access.
There is a big catch to using NTFSDOS with this bootdisk - The good old 640k conventional memory limitations of DOS is often a real big problem when it comes to running NTFSDOS. It seems to vary from network card driver to driver. Enabling extra options like Full Redirector, DNS, CD-ROM, Packet Driver, will also have a negative impact on memory and the success of NTFSDOS being able to load.
To modify the disk so your copy of NTFSDOS automatically loads, follow these intructions:
Running NTFSDOS off a network drive:
1. Download the read only NTFSDOS (dead link = http://www.sysinternals.com/files/ntfs30r.zip) (39KB). Or use the full version if you have that.
2. Extract this ZIP to a suitable share on your Server computer. Three files should appear. (eg, a PC on the network that the bootdisk can connect to)
3. Edit SCRIPT2.BAT* - scrolling down towards the end of the file, you'll see a section regarding NTFS support. (Or use your editor's Find function to search for the line "net use x: \\server\share")
4. Edit the net use command to suit your setup.
Running NTFSDOS off a second Floppy, or CD-ROM:
1. Download the read only NTFSDOS (dead link = http://www.sysinternals.com/files/ntfs30r.zip) (39KB). Or use the full version if you have that.
2. Extract this ZIP to a seperate floppy / CD.
3. Edit A:\SCRIPT2.BAT* - scrolling down towards the end of the file, you'll see a section regarding NTFS support. (Or use your editor's Find function to search for the line "net use x: \\server\share")
4. Delete the line net use x: \\server\share
5. Edit the next line, so it points to B:\ or R:\ (CD-ROM) instead of x:\ntfsdos
(FYI: entering B:\ instead of A:\ will make DOS prompt you to change floppies!)
* SCRIPT2.BAT is now compressed inside FILES.UHA - You will have to extract the UHA file and recompress all the files again.
